 |
Welcome to the Reel Boating Forum.
From Trailer Boaters to Captains to Marine Industry Professionals, the Reel Boating Forum welcomes you to join in with other boaters and fishermen discussing topics including sportfishing, marine electronics, boating safety, boat engines and more. Use our FREE boat classifieds to sell your boat or fishing gear. Marine Industry Vendors are also welcome to register a username and freely post their products or services |


TheShortAnswer
-
Posts
146 -
Joined
-
Last visited
Content Type
Profiles
Forums
Events
Posts posted by TheShortAnswer
-
-
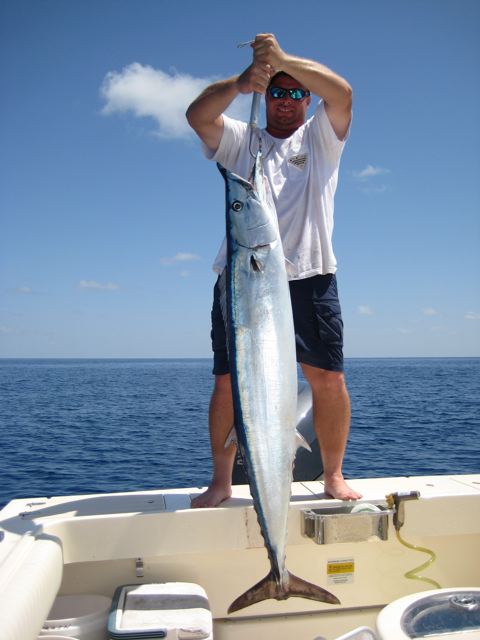
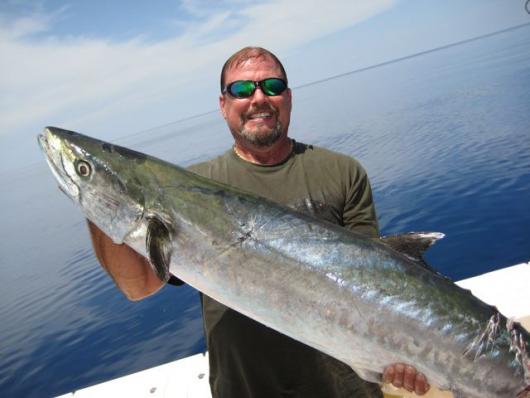
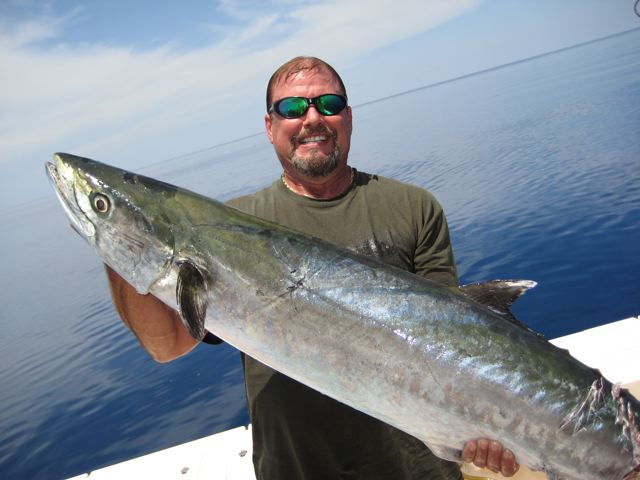
Caught these on my Parker during the past week. Sight casted to the hoo with a thread fin. Caught the king on a flat line/thread fin both while bottom fishing. Hoo was 62.5 and the king was 56.5 minus the lower third (cuda bite)......so probably the intact fish was high 60s best guess. All in all a great week in the Gulf.
-
friday the 3rd of JULY had a fun trip with friends. total catch:
14 snapper from 10 to 15 lbs.
5 SCAMP up to 20 lbs.
2 GAG up to 30 lbs.
5 reef donkeys up to 40 lbs.

those scamp are insane. nice haul.
-
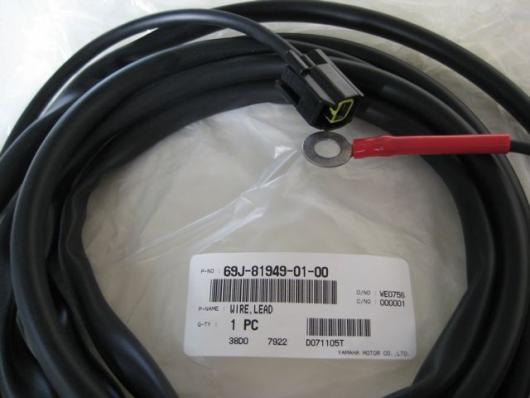
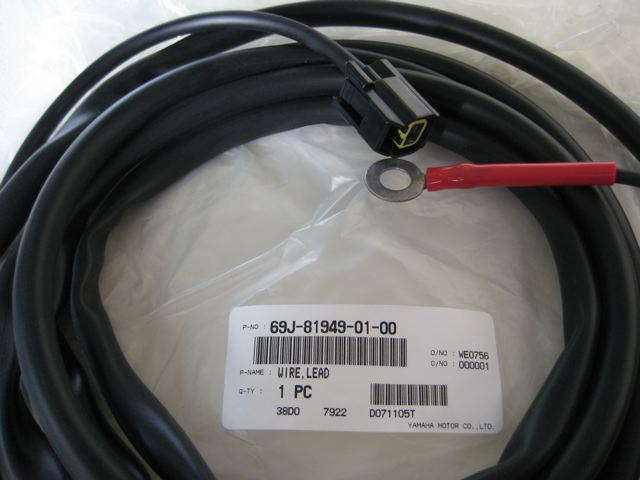
I ordered the kit and it came with a built in fuse. I believe there are two versions, mine was about $100 from sim and from Yamaha.
Must be a little different. No fuses on mine, just a wire in a sheath and two connectors on either end.....about $80 retail from the Yami dealer.
The last time I rigged this up, on the advice of the mechanic at the Yami shop, I made my own charging wire using the plug that gets removed from the charging lead. This time I was in a hurry to get offshore so plunked down the cash. Both have worked equally well.
-
not football players by any chance are they?
-
Mango,
Like I said, that's up to you. Probably nothing bad will ever happen, but you never know.
Brian,
What happens if there is a short while the switch is on? Lets say the wire chafes through at the point where it passes through the cowling. you now have a live wire inside the cowling. If it hits grounded metal, the fuse on the engine end will pop but the battery end is still live. There is nothing to stop it from dumping a whole lot of amperage into that metal. It could easily start a fire within the cowling or somewhere along the length of the wire. That could ruin your day.
Now, change the scenario to include fuses at both ends. The fuses pop and the worst thing that happens is your battery doesn't charge.
As far as the charger goes, ABYC says "each ungrounded conductor connected to a battery charger.... shall be provided with overcurrent protection within 7 inches of the connection point".
Exception 1) If the conductor is connected directly to the battery terminal AND is contained within a sheath or enclosure....overcurrent protection shall be as close as practicable to the battery, but not to exceed 72 inches.
Exception 2) If the conductor is connected to a source of power other than the battery terminal and is contained...., but not to exceed 40 inches.
So, to answer your question, yes, the terminal end of the battery charger leads need to be fused. If the charger wiring meets the one of the exceptions as listed above, then the supplied fuses are all you need.
I know the above is kind of doom and gloom, but most of the standards are written based on practical experience. An accident happens and the ABYC committee involved in that area looks for ways to solve the problem so it doesn't happen in the future. Some of the standards are written on a proactive basis, an issue is recognized and worked on before it becomes a problem.
ABYC standards are recommendations based on in-depth knowledge of the subject. You can use or ignore them as you wish.
sounds interesting. i was wondering why the wire was inside a sheath (exception 1).
-
Actually, the cables that go from the battery to the engine are there primarily to start the engine. Charging is a side benefit exploited by the outboard manufacturers. ABYC makes an exception for fusing starting cables. They do, however, require all other power sources to be protected. The fusing of this wire has nothing to do with protecting ancillary equipment, it is for fire safety.
The aux charge lead should be fused at both ends. The reasoning is that it could be considered a source from either end, that is to say, in a shorting situation the wire could get power from the battery or the engine.
You certainly don't have to follow ABYC standards but they have been well thought out over many years by some of the best in the business. Their primary purpose is to make boating as safe as possible.
i defer to your knowledge and ABYC...........the cable in the pic comes from Yamaha and plugs right in out of the package. i think i will keep it simple. as said in a previous post ......probably fused prior to the plug in.
-
Is it fused at both ends? It should be.
with no piece of electronic equipment needing protection, i see no need for fuses. the aux charging wire acts the same as the battery cables which are the "wires" that normally charge the batts.
-
I have a single engine (2006 f250) boat with 2 factory installed batteries. My windlass is direct wired to batt 2. Battery selector switch is the standard 1, 2, both, or off. Many guys like to run in "both" so that both batteries receive a charge from the alternator while running. I like to keep my batteries separate and either run in "1" or "2", that way I know I have a fresh battery available regardless if the other battery has a malfunction or is drained.
I have in the past practiced the advice of running out on "1" and back in on "2" but sometimes forget. On a recent trip I did forget and ruined battery 2 with the windlass. They were due to be replaced anyway......no biggie.
On the boat I have now, I never got around to using the Aux charging wire coming of the alternator. It is a capped plug-in that sits on the engine pan under the engine fuel filter. You simply pull the cap off and plug in the charging wire. Run the charging wire through the cable/wire chase that goes from the engine to the transom, then hook the positive (red) to the desired battery. In my case it was battery 2 which has the windlass direct wired.
By using the Aux charging wire, both batteries charge at all times while the engine is running regardless of selector switch position, and keeps the batts isolated from each other. One cool thing is the windlass (because it is DC) runs even faster because of the charging wire.........very cool. No more forgetting to change the batt switch.
You can buy the Yamaha charging wire (see my pic), or you can actually make one using the protective plug-in cap that you remove.
-
Was it hard to clean? I might try to do that first
hard to clean (?)....... just go for it. SeaStar says the piston between the two check valves also comes out as well.
-
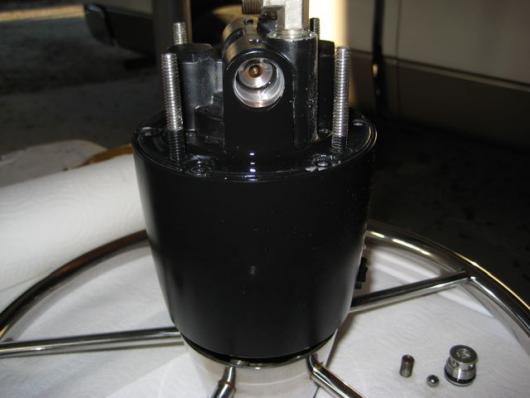
Assuming no by-pass valve problems m-ywedge.com make a product that keeps the outboard motor from falling to one side or the other. I use one and can recommend the product. Check out their website.
FWIW The MyWedge (i use it) keeps the engine from falling down in case of trim/tilt hydraulic failure and does nothing to keep the engine from falling "over" to port or stbd.
There are two check valves on either side of the helm pump. They can be accessed on both sides of the helm via a large straight slot cover about the size of a nickel. The check valve consists of a housing, spring, and ball bearing sealed by an o-ring. these can get gummed up or actually corroded if water/salt has entered the unit.
turning the wheel slowly with no engine movement unless you give it a quick jerk, is a classic symptom of a stuck check valve. prior to the jerk, the valve is stuck closed and not allowing the helm to push fluid down the line to move the cylinder/engine.
-
While we are on the sea star subject...................I replaced mine a while back and have bled it several times and my boat still drives like crap when I'm in the idle zones. I'm cranking the wheel back and fourth so much that it wears me out. My friends boats drive 1000 times better. When I'm not running and tilted up my engine stays put so I don't think I have a bypass problem. Going fast it drives great.
Any ideas?
if the seals are good, fluid level OK, and the helm is pushing fluid, then air is the likely culprit. i would have a local shop power bleed it.
FWIW i have not had any bad CS experiences with SeaStar. but i do think my original helm was lemon that barely made two years with acceptable performance. if this new one starts to act up, i will not hesitate to switch to another brand.
-
I have the same problem with mine right now.
Was it hard to bleed the system after you did it? I asked Seastar if they improved it,basicly I dont think they did.
Thanks for your post I guess I will be ordering one soon
not hard to bleed the system, just takes two people to do it. the instructions are clear and easy to follow. i recommend taking out anything near the helm that can get soiled by hydraulic fluid. it is kind of like working with 5200.......nearly impossible to do without getting some on you or where it is not supposed to be.
my engine would fall completely over between my house and the ramp (20 min ride). i did not have any leaks prior to the helm change and was fairly certain all the air had been bled as i had bled the system multiple times after cleaning the check valves.
took the boat out twice since the change out.........very smooth and responsive.......better than when the boat was new. (fingers still crossed).
-
my 3 yo Parker came standard with a SeaStar hh5271 (2006). worked as good as expected for the first two years. then the check valves started sticking. cleaned them periodically. then more and more frequently. the hydrauic fluid was beginning to add up. also the engine would fall over to one side while trailering.....no biggy but a PIA to get in the boat and straighten prior to launch.
finally decided to just bite the bullet and buy a brand new helm. best price was at Gotomarine.......very nice to deal with and quick delivery.
based on my research over the last year on SeaStar issues, it appeared that for good while there, they were having some quality issues, whereas prior to those issues, they had a pretty solid reputation. it seems that while my new helm pump still shares the same designation (HH 5271) it appears outwardly, and inwardly to be a better design (i hope) from the previous one.
installed it tonight, feels much smoother, even more so when the old one was new. time will tell (fingers crossed). point of interest if you get a new helm, save the old 90 degree fittings and use them, because the new ones that come in the box have too much plating on them and cannot be tightened as specified.
oh, and BTW the engine stays where i put it now.........the new helm has solved all the issues i had.
-
the silver lining of this story is that i am now proficient at dropping the LU and doing my own WP changes. that was the only maintenance issue i was not doing myself........now i can do it all.....yipee.

-
finally got this thing figured out.
Yamaha.....no help.
Tech..........gave up........must be the T-stats (more $$)
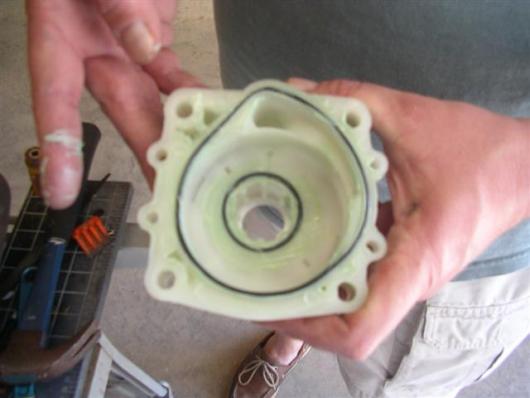
i ended up putting my "plumber's hat" on and doing some detective work.......and no, i am not a plumber. i dropped the LU and tapped off all the drain holes. i filled the plastic housing with water and bingo.......problem found and corrected.
yes.....it very well maybe a Yamaha problem. a new o-ring vendor perhaps?
see the bigger of the 2 o-rings. there is a pretty good groove for the larger o-ring except near the bottom of the pic. at that point the groove is deep along the outer edge, but the lip of the groove is very shallow on the inner edge. the problem is the o-ring is just slightly too small. slightly too big would have been better.....but hey....it is what it is. you can use grease to stick it in place but the weakest point being the shallow groove it will pull out and into the cup before you can sandwich it to the wear plate. what i had to do was stretch the o-ring which gave me a couple of minutes to get the thing bolted down on top of the wear plate. as long as the o-ring is in the groove, the wear plate will keep it there when you tighten the bolts.
she pees like a race horse now.
-
i think i have a pretty good understanding of the plumbing and how it is SUPPOSED to work. suction (without air leaks) is the key to the thing working. yeah, you are right.......when it works the way it is supposed to, you CAN hear the water rising in the water tube and filling the water passages in the engine and coming out the tell tale (pee hole). essentially the garden hose fills the WP housing which doesn't drain as fast as it is filling and the water bubbles back up the water tube and into the water passages. somehow or another water is draining/gushing out the openings in the lower unit faster than it can rise in the water tube to make it back up into the engine. like poking a hole in the top of a can so it can vent......some how the water tube is venting and allowing free flow out the bottom of the LU.
i'll get this thing figured out.
-
early 2006 Yamaha f250. yes, i have reviewed HotSpots most excellent tutorial.

had a Yamaha tech do the change. first change out since new. the old one was in excellent shape and worked perfectly, but changed it anyway. took the boat and it did pee and no overheat problems. took the boat home and hooked up the hose attachment to rinse out the engine. problem is all the water gushes out the lower unit intakes. comes out about 10 times more than before. due to this, not enough pressure to send water up into the engine water jackets and out the pee hole.
the tech dropped the LU to check his work and all is fine, with no change in the problem. he is going to call Yamaha on Monday. Any ideas as to what the issue might be? really strange......we are stumped as to why the water is gushing from the LU which is why it won't bubble up into the engine. plenty of water pressure.
-
i wanted to leave you with this video from a member from another site i'm on. it is truly outstanding.
-
very cool.
isn't that about trolling speed for hoos.

-
let the most experienced person do the deed while you hold the rod for them........watch and learn.
you can practice on the smaller fish. prescription sunglasses.........OUCH!
-
Thanks for the input, I've received other reports of breakage as well.
I've kinda gone over the edge researching the latest in jigging rods and will likely build a pair of rods using Riley blanks.
I've handled some trevala rods as well as other butterfly/jerk crank jigging rods and to me the trevalas seem to have tips that are too soft and too much back bone. I'd thought the torque would work for a specialized application, and they likely would, but it looks like the newer parabolic rods would be a better all around rod.
yep....that baby (50-100 Trevala) doubles over completely. had a 50 lb amberjack on that little rod and it went completely under the boat.....all i could do to keep it off the gunwale cap. but, it took a licking and is still ticking. all depends on what kind of action you want. you've got some pretty big boys swimming around up there. a stiffer rod may be the ticket for you. let us know how things work out.
-
I bought and use Trevalas based on input from tackle shops owners I know. They said the Penn would break.
A friend of mine asked me what to buy recently....I said 50-100 Trevala. He bought a Penn.....it has already broken. He owns a Trevala now. Penn is probably a great rod for all I know......just sharing my recent experience.
tight lines.
-
ah cmon........they were just looking for their stimulus checks.

-
It's on my bucket list.
Got any insight to this area? Just how far is it from St Pete to good fishing?
Thanks in advance.


Big Kings and Wahoo running off St Pete
in Boating and Fishing Discussion
Posted · Edited by Mango Tango
pipe/135ft on the hoo, 90 mi/JP bearing 270 on the king.
king steak anyone?.........on a full sized dinner plate